Step-by-Step Enemy Creation
Documentation Unreal Engine AI Tutorial
Comprehensive guide to creating a complete enemy from scratch with weapons, animations, and advanced features.
Create a complete enemy from scratch: weapons, animations, and full AI behavior.
Prerequisites
Before starting, ensure you have:
- Character skeletal mesh with attack animations
- Attack animation montages with hit frames identified
- Basic understanding of Gameplay Ability System
- Unreal Engine 5.6+ installed
Step 1: Character Setup
Create Blueprint:
BP_DetailedEnemy (inherits AEnemyCharacterBase)In Components Panel:
- Select SkeletalMesh component and set your character mesh
- Select CapsuleComponent and adjust radius/height to fit mesh
- Select CharacterMovement component and adjust if needed
What the base class provides:
USECMeleeTraceComponentfor hit detectionUAbilitySystemComponent(configured)IAbilitySystemInterface(implemented)USECActionSetComponentfor action set resolution and replicated action stateUSECCombatRoleComponentfor replicated combat role
Set AIConfig: In the Details Panel, set
AIConfig to DA_AIConfig_EnemyDefault (included with the plugin) or your own UEnemyAIConfig data asset.The controller'sSECCombatControllerComponentchecks the pawn for an AIConfig first. If none is set on the pawn, the component uses its ownDefaultAIConfigfallback. If neither is set, the AI has no behavior.
Not inheriting from EnemyCharacterBase? AddSECMeleeTraceComponent,SECActionSetComponent, andSECCombatRoleComponentmanually. ImplementIAbilitySystemInterfaceand set up your ownAbilitySystemComponent. The system only requires these components to be present on the pawn.
Step 2: AI Controller Setup
Option A: Use EnemyControllerBase (Recommended)
Create Blueprint:
BP_DetailedEnemyController (inherits AEnemyControllerBase)What the base class provides:
// These components are created as default subobjects:
USECCombatControllerComponent*  // Combat system integration (AIConfig, roles, sync)
UMovementEvaluatorComponent*    // Tactical movement direction selection
UActionEvaluationComponent*     // Action scoring and execution
UThreatDetectionComponent*      // Player attention tracking
UBotStateTreeAIComponent*       // StateTree AI runner
UBehaviorTreeComponent*         // Helper BT for action sequences (not the BrainComponent)
Additional features: smooth focus rotation with owner-keyed
LockRotationBy/UnlockRotationBy (an ability holds a lock that self-releases when it ends, cancels, or is destroyed; abilities on UGameplayAbilityBase get this through bLockAIRotation), team ID via ISECTeamInterface, and K2 Blueprint events for role changes and target loss. The keyless LockRotation/UnlockRotation pair remains for backward compatibility.Option B: Use Any AAIController + Components
If you have an existing AI controller, add
SECCombatControllerComponent in the Components panel. Then add whichever other SEC components you need (MovementEvaluatorComponent, ActionEvaluationComponent, etc.). All components connect on possession.Threat-to-movement response is auto-wired if both
ThreatDetectionComponent and MovementEvaluatorComponent are present. Configure bSwapStrafeOnHighThreat and bAdjustDistanceByThreat on the MovementEvaluatorComponent (or through a MovementBehaviorProfile).Customization hooks: SubclassSECCombatControllerComponentin Blueprint and overrideSyncStateForCombatRole(custom role-change behavior) orHandleCombatTargetLost(custom target-loss fallback). SubclassActionEvaluationComponentand overrideCanExecuteActionfor custom action gating.
Movement settings are on the
MovementEvaluatorComponent. The showcase controller defaults produce smooth, realistic movement. Enable bDebugLog to see movement decisions in the output log.Step 3: Create an ActionSet
Create Data Asset:
DA_DetailedEnemyActions (type: ActionSet)Add actions to the
Actions array. Each entry is an FActionSpec.Action 1: Light Attack (Close Range)
| Property | Value | Notes |
|---|---|---|
| ActionId | LightAttack | Unique identifier for chaining and cooldowns |
| ExecutionMode | GameplayAbility | Simple ability execution |
| AbilityClass | GA_LightAttack | AbilityTag and AbilityEndTag are auto-generated from the class |
| DistanceEval | ||
| ↳ MinValue | 0 | Valid from 0cm |
| ↳ OptimalMin | 100 | Score = 1.0 starts |
| ↳ OptimalMax | 250 | Score = 1.0 ends |
| ↳ MaxValue | 400 | Score = 0 beyond this |
| AngleEval | ||
| ↳ OptimalMax | 30 | Up to 30 degrees is ideal |
| ↳ MaxValue | 90 | Not used beyond 90 degrees |
| Cooldown | ||
| ↳ Duration | 2.0 | 2 second cooldown |
| ↳ InitialCooldown | 1.0 | Cannot use during first second after spawn |
| SelectionWeight | 1.0 | Base selection weight |
Action 2: Heavy Attack (Medium Range)
| Property | Value | Notes |
|---|---|---|
| ActionId | HeavyAttack | |
| ExecutionMode | GameplayAbility | |
| AbilityClass | GA_HeavyAttack | |
| DistanceEval: OptimalMin | 150 | Slightly farther than light |
| DistanceEval: OptimalMax | 300 | |
| Cooldown: Duration | 4.0 | Longer cooldown |
| SelectionWeight | 0.8 | Lower base weight |
| RiskPenalty | 1.5 | Divides score, making it less frequent |
To make this combo from a light attack, set
PreferredNextActionId to HeavyAttack on the LightAttack action, and set ChainBonusMultiplier to 1.5 for a 50% score boost when chaining.Action 3: Defensive Retreat (When Too Close)
| Property | Value | Notes |
|---|---|---|
| ActionId | QuickRetreat | |
| ExecutionMode | BehaviorTreeSequence | Uses a BT for movement logic |
| BehaviorTreeSequence | [BT_QuickBackstep] | Array of BTs to run in order |
| DistanceEval: OptimalMin | 0 | Best when very close |
| DistanceEval: OptimalMax | 100 | |
| Cooldown: Duration | 3.0 | |
| SelectionWeight | 1.5 | Higher priority when in range |
| TagScoreMultipliers | ||
↳ State.PlayerAttacking | 2.0 | Doubles score when player is attacking |
TagScoreMultipliersmapsFGameplayTagtofloat. If a key tag appears on the AI (SelfTags), the target (TargetTags), or the world (WorldTags, set by your code), its value multiplies the score. Examples:State.Stunned(2.0) on the target,Self.Enraged(1.5) on the AI,World.Phase.BossPhase2(1.3) for late-fight aggression.
Step 4: Create Gameplay Abilities
For each action using
GameplayAbility execution mode, create an ability Blueprint.Recommended: Inherit from
GameplayAbilityBase (included in the plugin). This base class automatically sends the AbilityEndTag event when the ability ends, even if interrupted. If you do not use this base class, you must send the end tag manually or the AI will get stuck.Example: GA_LightAttack (inheriting from GameplayAbilityBase)
Event ActivateAbility
  ↓
Play Montage and Wait
  • Montage: AM_LightAttack
  • Rate: 1.0
  ↓ On Completed / On Cancelled / On Interrupted
End Ability
If not inheriting from GameplayAbilityBase: You must callSendGameplayEventToActorwith theAbilityEndTagin every exit path (completed, cancelled, interrupted). TheActionEvaluationComponentwaits for this event to know the action finished. The built-inGA_SEC_Attackis a reference implementation that handles this correctly.
Step 5: Configure Animation Montages
Create Montage:
AM_LightAttack from your attack animationAdd Melee Trace Notify State:
- Right-click the timeline at the attack's active frames
- Add Notify State ➜
SECMeleeTraceWindow - Set the duration to cover the weapon swing (e.g., frames 10-25)
- Optionally add a MotionWarping notify state for chase behavior during specific frames
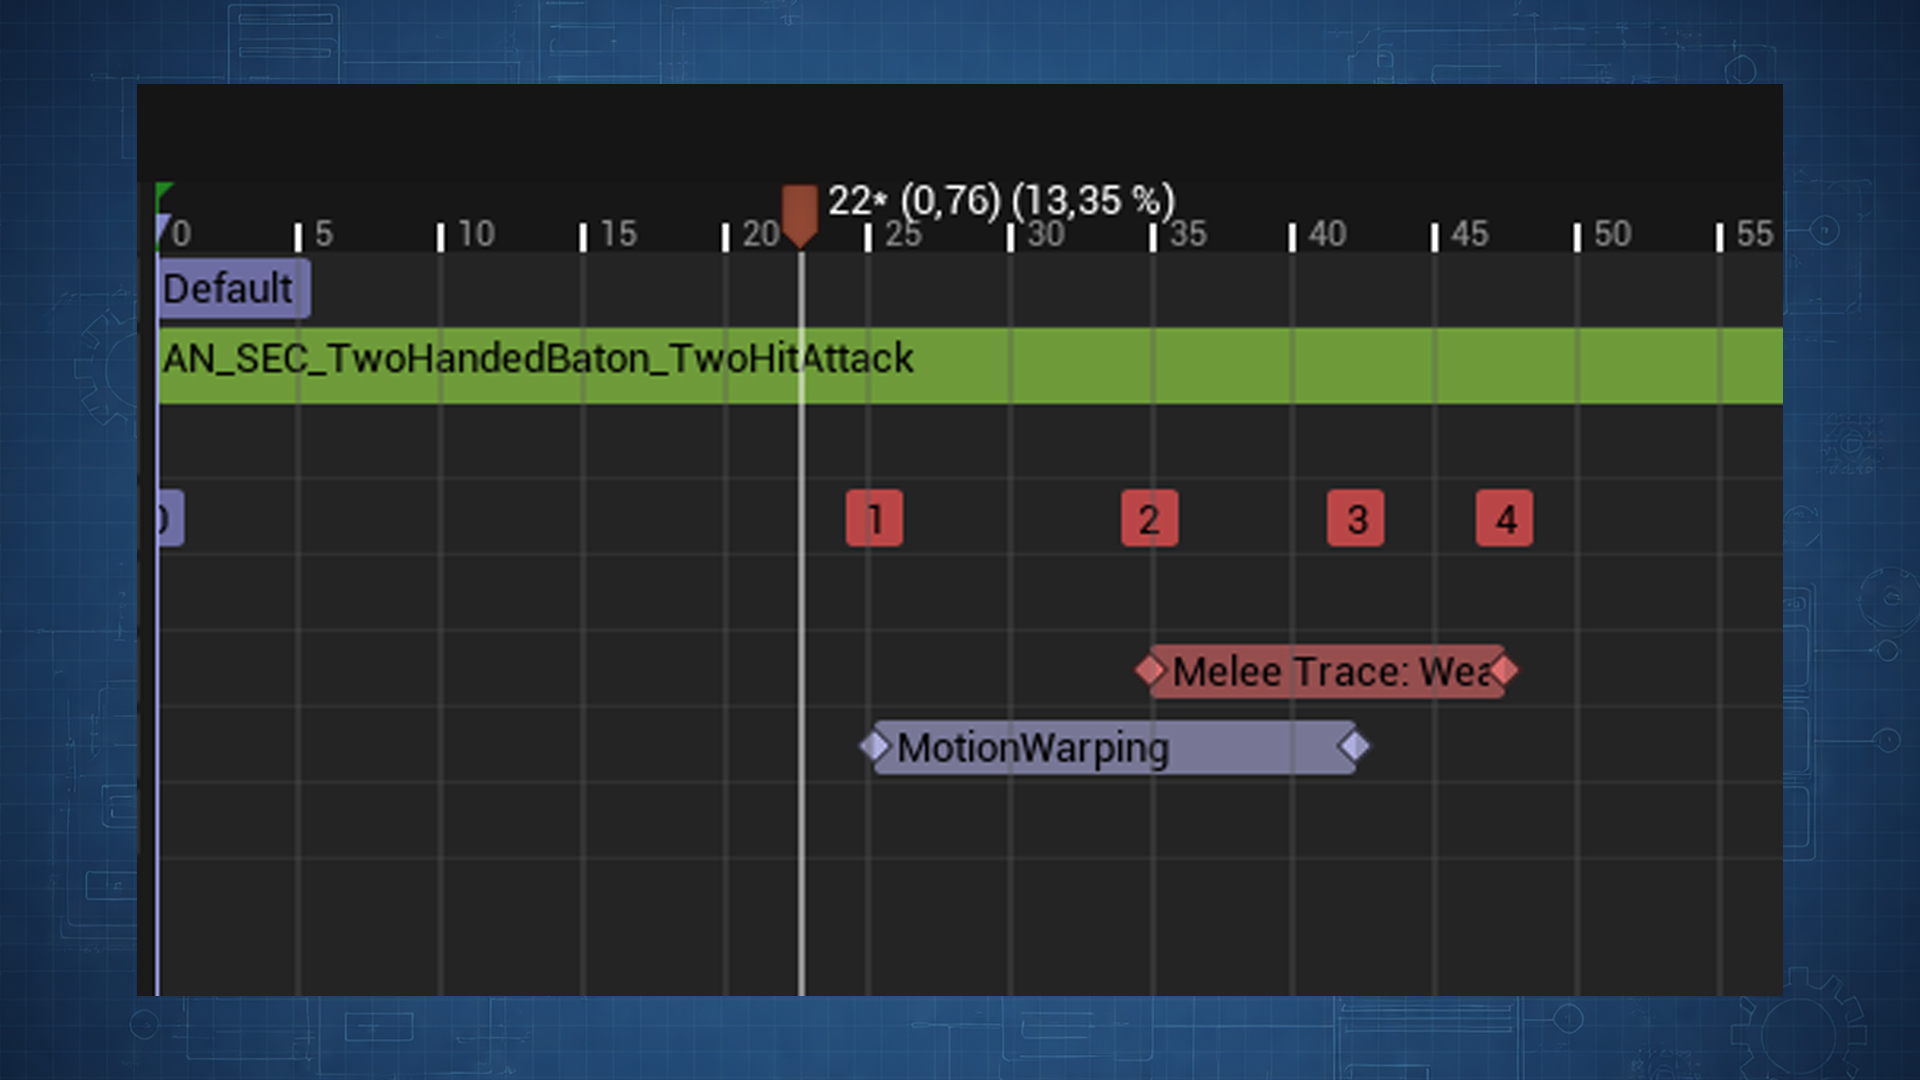
Configure the Notify State:
In the Details Panel of the
SECMeleeTraceWindow notify:- Socket IDs:
["Blade"]- This must match the trace socket ID registered on the weapon (see Step 6), not a skeleton socket name - DamageConfig:
DA_SwordDamage- Assign the damage configuration data asset here
Timing Example:
Frame:     0    10    20    30    40    50
Animation: [━━━━][━━━━][━━━━][━━━━][━━━━]
           Windup Strike  Follow Recovery
Trace:          [═════════]
Step 6: Create Weapon
Create Blueprint:
BP_Sword (inherits ASECWeaponBase)Class Defaults:
| Property | Value | Notes |
|---|---|---|
AttachSocket | hand_r | Socket name on the character skeleton (default) |
AttachOffset | FTransform::Identity | Relative transform applied after attachment |
AnimLayerToUse | (optional) | Animation layer class to apply when equipped |
TraceSockets Array:
Add an element:
| Property | Value | Notes |
|---|---|---|
ID | Blade | Must match the Socket IDs in the montage notify |
Shape | CapsuleTwoPoint | Trace shape (Sphere, Capsule, CapsuleTwoPoint) |
SocketOrBoneName | blade_start | Socket on weapon mesh (start point) |
EndSocketOrBoneName | blade_end | Socket on weapon mesh (end point) |
Radius | 15.0 | Trace radius |
Weapon Mesh Setup:
- The base class does not add a mesh component by default. Add a
StaticMeshComponentorSkeletalMeshComponentand set your mesh. - Add sockets to the weapon mesh:
blade_startat the blade base,blade_endat the blade tip - Position sockets along the cutting edge
For different weapon types, select the trace shape that fits best. A hammer could useSphere, a spear could useCapsuleTwoPointwith a longer radius. TheFSECTraceSocketsupports multiple shapes for different scenarios.
What Happens Automatically:
- On equip: Registers trace sockets with the character's
SECMeleeTraceComponent - During montage notify: Traces activate between sockets
- On hit: Applies damage via the
SECDamageConfigassigned on the notify state
The system calls Unreal'sApplyDamageon hit. If you need a custom damage pipeline, you can listen to the delegates onSECMeleeTraceComponentand handle damage your own way.
Weapon Drop on Death:
When an AI dies,
HandleDeath automatically unequips the weapon using an FSECUnequipContext with bSimulatePhysics = true. The weapon detaches from the character and is available for physics simulation. This is controlled by the bDropWeaponOnDeath property on SECCombatControllerComponent (defaults to true).To apply physics and lifetime after the drop, override
K2_OnUnequipped in your weapon Blueprint:- Check the
Context.bSimulatePhysicsflag - Enable
SetSimulatePhysicson the weapon mesh - Optionally apply
Context.PhysicsDropImpulseas an impulse - Call
SetLifeSpan(Context.PhysicsDropLifetime)to auto-destroy
If you need the weapon to drop mid-animation (e.g. from an AnimNotify during a death montage), set
bDropWeaponOnDeath to false and trigger the unequip yourself from Blueprint.Step 7: Create Damage Configuration
Create Data Asset:
DA_SwordDamage (type: SECDamageConfig)| Property | Default | Notes |
|---|---|---|
Damage | 10.0 | Base damage amount |
DamageTypeClass | UDamageType | Damage type passed to ApplyDamage |
AttackTag | (empty) | Optional gameplay tag for reactions/resistances |
bCanBeBlocked | true | Whether this attack can be blocked |
bCanBeParried | true | Whether this attack can be parried |
StaggerStrength | 10.0 | Poise damage (how much it breaks stance) |
KnockbackStrength | 0.0 | Knockback force on hit |
SECDamageConfigisBlueprintable. If you need additional properties (elemental types, status effects), create a Blueprint child class and add your custom fields.
Step 8: Build StateTree Logic
For most cases, use the includedStateTree_SEC_Coreinstead of building from scratch. It handles the standard combat loop out of the box. The breakdown below is for learning or for situations where you need a fully custom tree.
Create StateTree:
ST_DetailedEnemy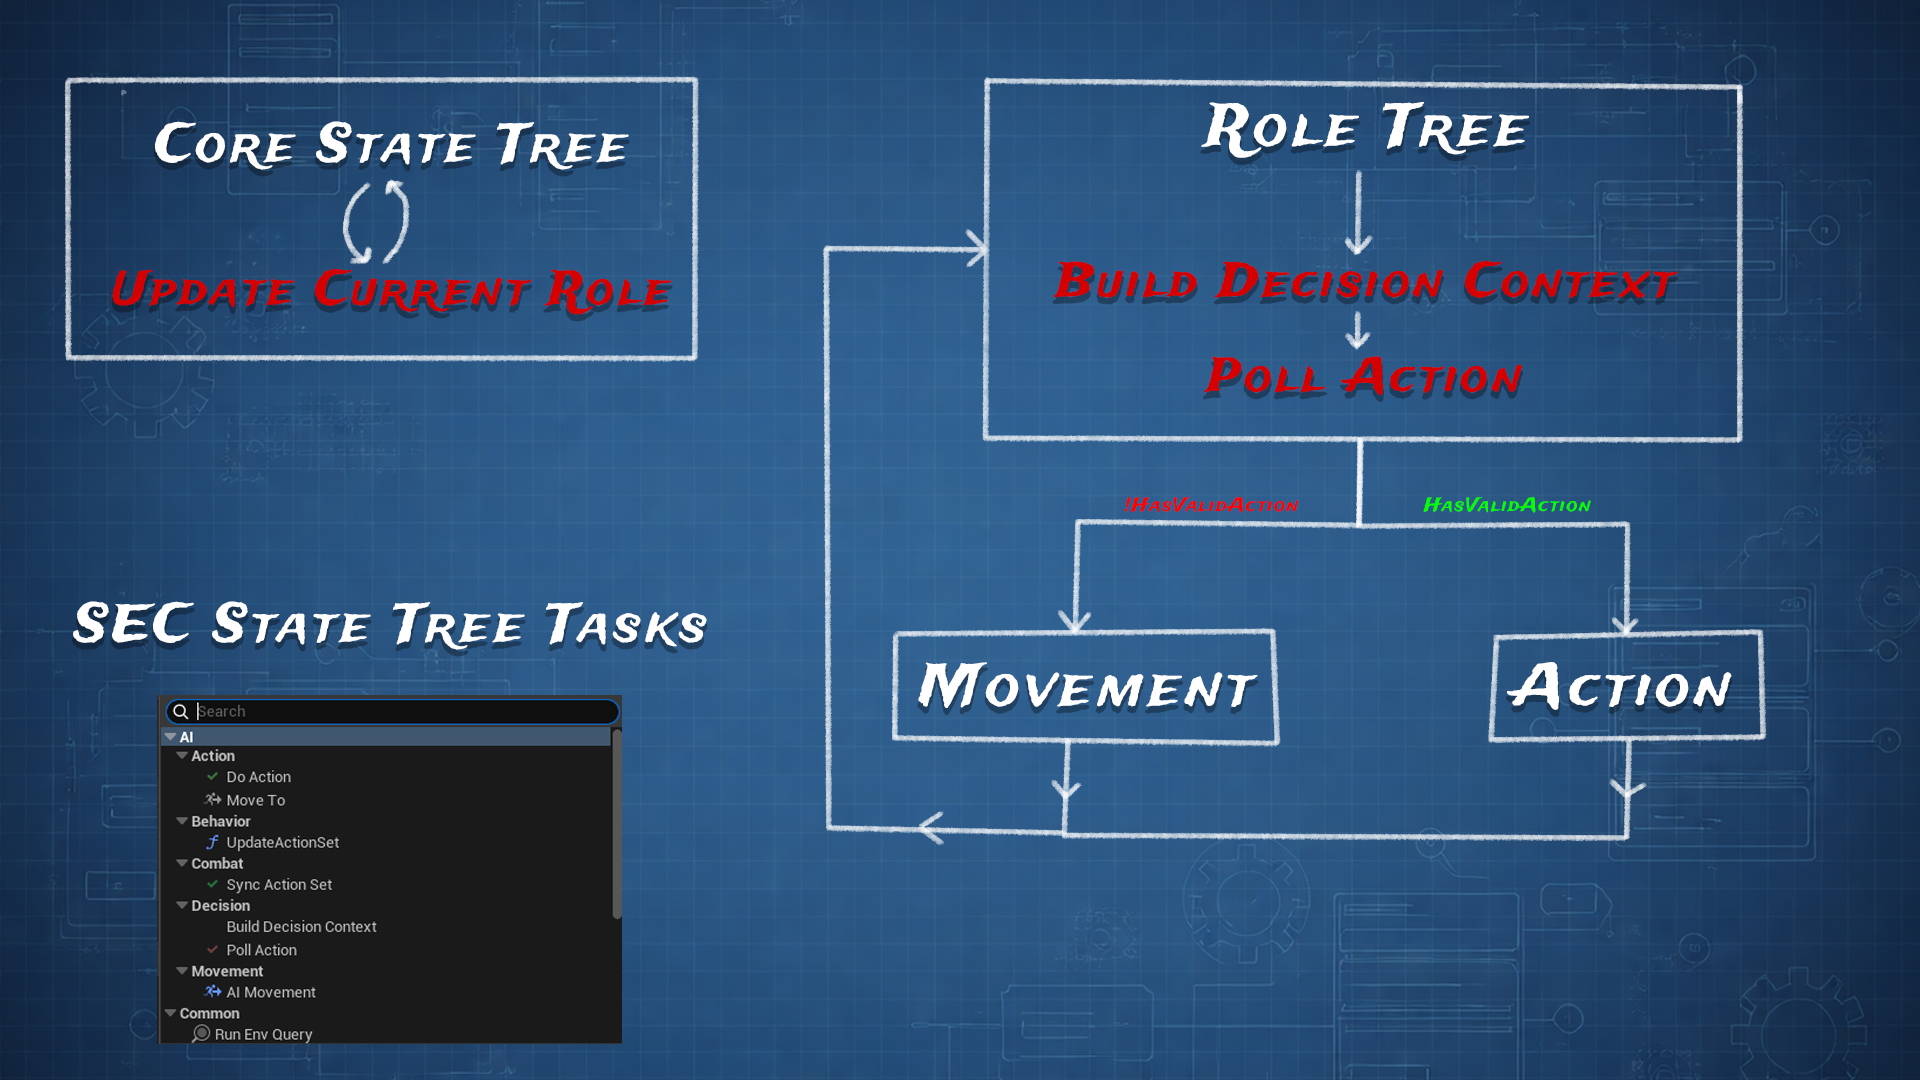
Core StateTree structure:
StateTree: (Core)

├─ Root State
│  │
│  ├─ Combat State
│  │  • Condition: Target is valid AND role is not SEC.Role.None
│  │  │
│  │  ├─ Role State
│  │  │  • Condition: SEC.Role.* matches current role
│  │  │  └─ Linked Subtree: → StateTree_SEC_MoveAndAction
│  │
│  └─ Idle State
│     • Task: Delay 1.0

StateTree: StateTree_SEC_MoveAndAction

├─ Root State
│  • Task: Sync Action Set from Pawn
│  │
│  └─ Role State
│     • Tasks: PollTargetActor, Build Decision Context, Poll Action
│     │
│     ├─ Move State
│     │  • Task: AI Movement (Distance: 600)
│     │  └─ Transition → Action State
│     │
│     ├─ Action State
│     │  • Task: Do Action
│     │  ├─ Transition → Recovery State (Success)
│     │  └─ Transition → Role State (Failure)
│     │
│     └─ Recovery State
│        • Task: Delay Parameters.RecoveryDuration
│        └─ Transition → Role State
Step 9: Test Your Enemy
Place in Level:
- Drag
BP_DetailedEnemyinto the level - In Details Panel ➜ Pawn ➜ AI Controller Class ➜ set to
BP_DetailedEnemyController
Debug Configuration:
Enable per-component logging:
ActionEvaluationComponent → bDebugLog: true
MovementEvaluatorComponent → bDebugLog: true
Expected Output Log Messages:
LogEvaluation: Evaluating 3 actions for BP_DetailedEnemy_1...
LogEvaluation: [LightAttack] Dist:180 Angle:15 Score:0.95 SELECTED
LogEvaluation: [HeavyAttack] Dist:180 Angle:15 Score:0.60 (cooldown)
LogEvaluation: [QuickRetreat] Dist:180 Angle:15 Score:0.10 (too far)
Expected Behavior:
- Approaches to ideal distance range
- Strafes around player
- Executes light attack when in optimal range
- Occasionally uses heavy attack with combo chaining
- Retreats if player gets too close or is attacking
Common Issues
| Problem | Cause | Solution |
|---|---|---|
| AI does not attack | Ability not activating | Check AbilityClass is set on the action, verify ASC grants the ability |
| AI repeats same action | Only one action scores well | Add more actions with different distance/angle ranges |
| AI does not move | Movement not driven | Check STTask_AIMovement is present and ticking in the StateTree |
| Weapon does not hit | Socket mismatch | Verify the notify state's Socket IDs match the weapon's TraceSockets ID |
| AI gets stuck after attack | End tag not sent | Use GameplayAbilityBase or manually send the AbilityEndTag event |